Customize the Sender Name and Message on Confirmation and Reminder Emails
Personalize the emails respondents receive: set a custom sender name ("your name via Grasshopper Signup") on confirmation emails and a custom message on confirmation and reminder emails. Includes a reminder-only message override.
You can personalize the emails your respondents receive: the sender name they see on confirmation emails, and a custom message that appears at the top of confirmation and reminder emails. Both live together in the Personalize Emails section on your form's options page. It's a free feature.
Sections in This Guide
- WHERE TO FIND THESE SETTINGS: Open the Personalize Emails section.
- SET THE SENDER NAME: Make confirmation emails come from "your name via Grasshopper Signup".
- ADD A CUSTOM MESSAGE: One message at the top of confirmation and reminder emails.
- SET A DIFFERENT MESSAGE FOR REMINDERS ONLY: Override the form-level message for reminder emails.
- LINKS AND FORMATTING: How URLs render and what formatting is supported.
WHERE TO FIND THESE SETTINGS
Step 1: Open the form's Form Options page
Start on your Dashboard. On the form's card, click Options to open the Form Options page.
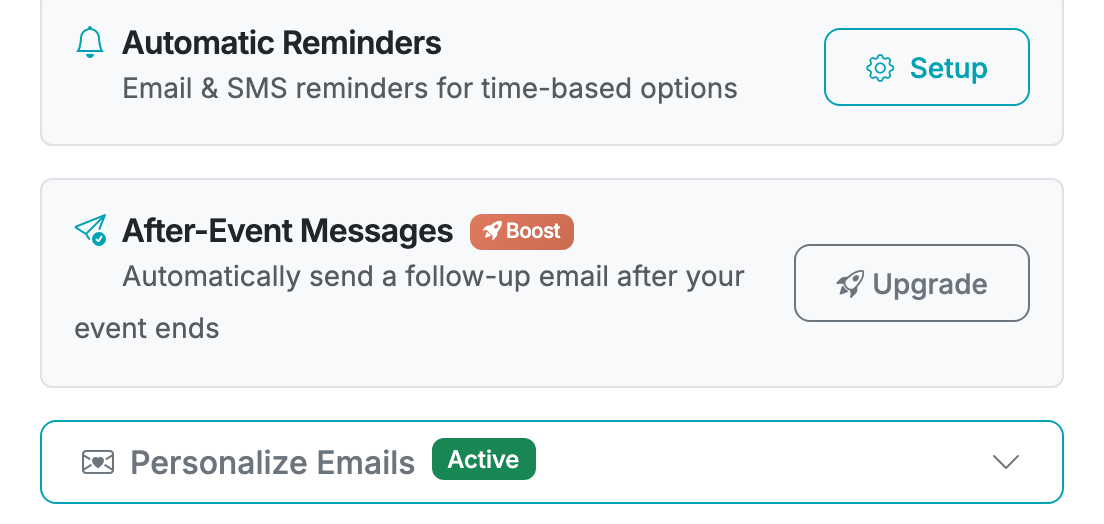
Step 2: Expand "Personalize Emails"
Scroll to the Form Settings card and click Personalize Emails to expand it. Once you've saved a sender name or a message, a green Active badge appears next to the label.
SET THE SENDER NAME
By default, the confirmation emails respondents receive show a sender name of Grasshopper Signup. You can personalize it so recipients instead see the name you choose followed by via Grasshopper Signup, for example Lincoln Elementary PTA via Grasshopper Signup. This changes only the display name: the emails still send from our verified address (so deliverability is unaffected), and replies still go to you.
Step 1: Enter a sender name
In the Sender name field, type the name you want (up to 50 characters). The line just below shows a live preview of exactly what recipients will see.
Step 2: Save
Click Save. To go back to the default "Grasshopper Signup", clear the field and save again.
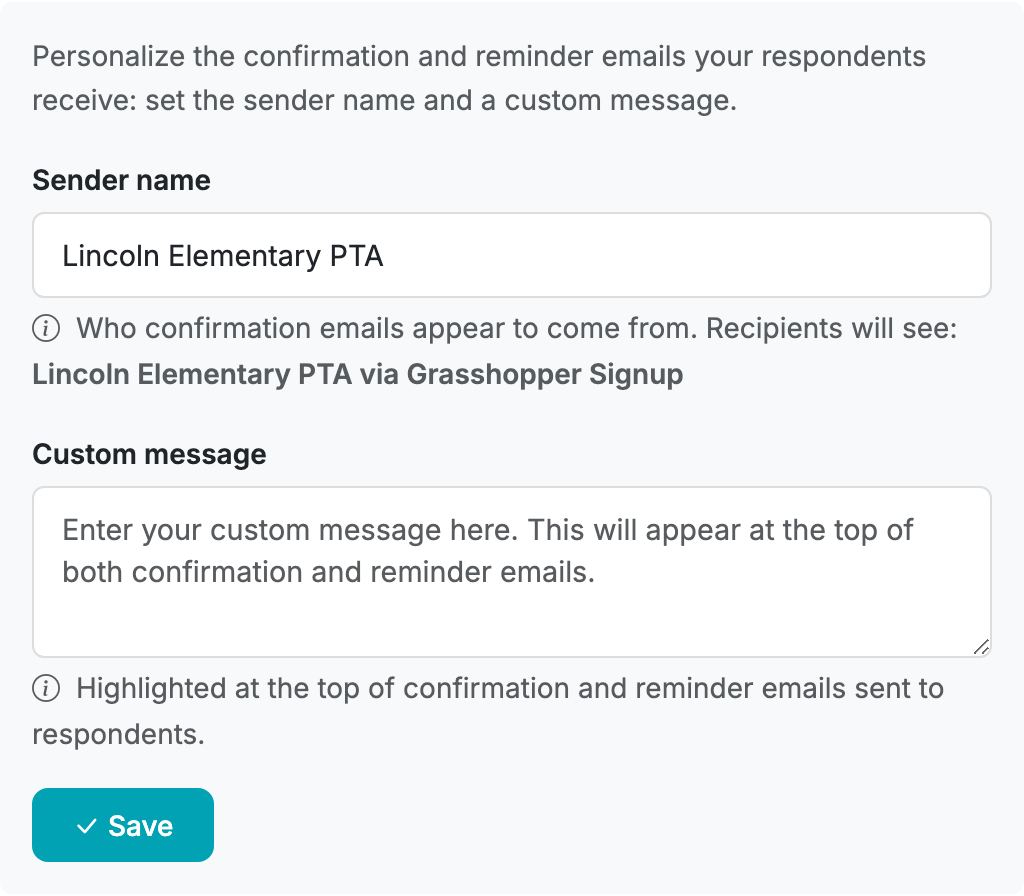
The sender name applies to confirmation emails. (The custom message below applies to both confirmation and reminder emails.)
ADD A CUSTOM MESSAGE
The Custom message appears highlighted at the top of both confirmation emails (sent immediately after a respondent submits) and reminder emails (sent before events). Use it for things like parking instructions, what to bring, a thank-you note, or a link to the venue.
Step 1: Type your message
Enter your message in the Custom message textarea. The help text reads: "Highlighted at the top of confirmation and reminder emails sent to respondents."
Step 2: Save
Click Save (one Save button saves both the sender name and the message). To remove the message later, expand the same section and click Clear message.
SET A DIFFERENT MESSAGE FOR REMINDERS ONLY
If you want reminder emails to say something different from the confirmation email (for example, a confirmation message that welcomes the respondent, and a reminder message that gives last-minute logistics), you can override the form-level message inside Reminder Settings.
Step 1: Open Reminder Settings
From your Dashboard, click Options on the form's card. Scroll to the Form Settings section and click Setup on Automatic Reminders. (For full reminder setup, see Setup Automatic Reminders.)
Step 2: Find the Custom Message (Optional) card
Scroll to the bottom of the Reminder Settings page to the Custom Message (Optional) card.
Step 3: Enter a reminder-only message
Type the message you want in reminders. The help text spells out the override behavior:
- If your form already has a custom message saved (in Personalize Emails), the help text reads: "Leave blank to use your form's existing custom confirmation message in reminders. Anything you enter here will replace it for reminders only."
- If your form has no custom message saved yet, the help text reads: "If your form has a custom confirmation message, reminders will use that by default. Add a message here to override it for reminders."
Step 4: Preview and save
Use the Preview Your Reminder Email section just below to send yourself a test reminder and see how the message renders. Then click Save Reminder Settings at the bottom of the page.
How the two settings combine:
- Form-level custom message set, reminder-level blank → both confirmation and reminder emails use the form-level message.
- Form-level set, reminder-level set → confirmation emails use the form-level message; reminder emails use the reminder-level message.
- Form-level blank, reminder-level set → confirmation emails have no custom message; reminder emails use the reminder-level message.
- Both blank → no custom message in either.
LINKS AND FORMATTING
Both fields are plain-text textareas: there is no rich-text editor, no bold/italic toolbar, and markdown is not supported. A few things still happen automatically when the email is rendered:
- URLs are auto-linkified. Paste a URL like
https://example.com/event-detailsdirectly into the textarea and it will appear as a clickable teal link in the email. URLs withouthttp://orhttps://(e.g.example.com) are also detected and linked. - Trailing punctuation is handled. If you write "Visit example.com.", the period is left outside the link so it doesn't break the URL.
- Line breaks are preserved. Pressing Enter to start a new paragraph in the textarea will render as a line break in the email.
- You can't customize link text. The URL itself is the link text, so there is no way to write something like "click here" and have it link to a hidden URL.
- HTML and scripts are stripped. Anything that looks like HTML tags is escaped for security, so don't paste raw HTML expecting it to render.
If you need a richer message, the simplest approach is to write the relevant info in plain English and include any links inline as full URLs, e.g. "Bring a yoga mat. Directions to the studio: https://maps.example.com/studio-location".